Dynamixel
From Robin
| Line 146: | Line 146: | ||
* USB connector | * USB connector | ||
| - | '''Note:''' For debugging purposes (to see print on serial monitor), you would need to use a serial USB converter such as [https://emanual.robotis.com/docs/en/parts/interface/ln-101/ LN-101] or use [https://docs.arduino.cc/hardware/leonardo Arduino Leonardo]. | + | '''Note:''' For debugging and troubleshooting purposes (to see print on serial monitor), you would need to use a serial USB converter such as [https://emanual.robotis.com/docs/en/parts/interface/ln-101/ LN-101] or use another Arduino board with built-in USB-serial interface such as [https://docs.arduino.cc/hardware/leonardo Arduino Leonardo]. |
==== Software ==== | ==== Software ==== | ||
* Arduino IDLE | * Arduino IDLE | ||
Revision as of 14:08, 5 May 2023
See our getting started template on https://github.uio.no/robin-engineer/dynamixel
Pinout:

Contents |
Information
The three dynamixel series in use are AX-12A, AX-18A and MX series. This guide for "getting started" is based on these three series. Refer to the image below for difference in the dynamixel series.

Getting Started
Components
Hardware
- PSU - Dynamixel power supply
- USB2Dynamixel converter
- Dynamixel AX/MX series
- Connecter – Power hub
Software
Connecting Dynamixel
Connect Dynamixel to PC using USB2Dynamixel converter. For AX series, only 3P connecter is required.
- Connect the dynamixel to connector using 3P connector.
- Using another 3P connector connect the USB2Dynamixel converter to connector.
- Connect Dynamixel PSU to connector (LED on the connector should turn on and the LED on the Dynamixel will blink upon connecting to power)
Update Firmware
Firmware controls the dynamixel and is installed on the dynamixel. It can be updated through the following steps:
- Open "RoboPlus" to launch “Dynamixel Wizard" or directly open “Dynamixel Wizard”.
- Select the right port and open it.
- For windows the ports would be COM*, for LInux it should be in the form /dev/ ttyUSB*
- <Start search> and on the side you should be able to see the actuator/dynamixel connected. Clicking on it would open up its description.
- Select <Dynamixel firmware update> and follow the steps mentioned by the wizard. For more information refer to Dynamixel firmware update
 Dynamixel firmware update
Factory reset
Factory reset can be carried out if the firmware of the dynamixel servo motor becomes corrupted or damaged. It is also useful if you wish to set the Dynamixel servo motor to its default settings, erasing any custom control parameters previously set. Follow the steps below to carry out factory reset.
- Through Roboplus or directly open “Dynamixel Wizard”.
- Click on dynamixel firmware recovery and follow the steps mentioned by the wizard
 Dynamixel recovery firmware
 - For more detailed info refer to step 4.
Assign IPs/ IDs
Ids are assigned automatically to dynamixel when they are connected. If you want to view or change the assigned ID:
- Launch dynamixel wizard
- Select the port the USB2Dynamixel is connected to.
- Open the port and start search.
- On the side you should be able to see the actuator/dynamixel connected. Clicking on it would open up its description.
- In description, you can click on <ID>, change the id by assigning a new ID from <ID list> and selecting <Apply>.
- Your dynamixel should now have the new IP/ID.
Facts to consider
You should consider setting the limits for position, velocity, torque, and temperature on a dynamixel servo motor to ensure safe and reliable operation. These limits help prevent the servo motor from exceeding its safe operating range (such avoiding collisions).
Dynamixel servo does come with default limit, however they might not be suitable for all applications. Therefore it is important to consider the specific requirements of your system and adjust the limits accordingly.
These limits can be adjusted using dynamixel wizard. The same steps to change an ID applies to the limits.
Position limit can be altered using "CW/CCW angle limit". Temperature limit is controlled by "The Highest Limit Temperature" Torque limit can be adjusted through "Max torque" Velocity can be controlled by "Moving speed"
Communicating with Dynamixel
Through Python
There are multiple python libraries available which can be used to communicate with the dynamixel.
AX-12 Series
Preferred Library : pyxa12
- For linux, the library can be loaded using:
pip install --pre pyax12
pip install --upgrade pyax12
pip uninstall pyax12
Or
git clone https://github.com/jeremiedecock/pyax12.git
cd pyax12
python3 setup.py install
This library contain multiple examples such as toggle led to see which dynamixel corresponds to a specific id (led.py) as well a scan.py file where the set of ids for the dynamixel at specific baudrate can be identified. This can also be used to see what the id of one dynamixel is.
for other OS (Windows and Mac) refer to pyxa12
AX-18 Series
Preferred Library: PyDynamixel library
Follow the instructions to load the library:
git clone https://github.com/quentinsf/PyDynamixel.git
cd PyDynamixel

python3 setup.py install
Note: this is the forked version of the original library as the original library only works with python2 so will give error message regarding importing registers with python3.
You could test out led_test.py to toggle the LED on the servos.
Note: Make sure the ID, baudrate as well as port name is altered according to the dynamixel and port used.
The best way and easiest way to see the ID, baudrate is to check through dynamixel wizard.
This search would also show the dynamixel is operating as it should.
Through Arduino using Dynamixel Shield
Hardware
- PSU - Dynamixel power supply
- Dynamixel AX/MX series
- 3P/4P connector
- Dynamixel Shield
- Arduino (Uno)
- USB connector
Note: For debugging and troubleshooting purposes (to see print on serial monitor), you would need to use a serial USB converter such as LN-101 or use another Arduino board with built-in USB-serial interface such as Arduino Leonardo.
Software
- Arduino IDLE
Required Libraries
- Dynamixel shield
- Dynamixel2Arduino (can also be downloaded as a dependency when Dynamixel Shield is installed)
Installation Process
Through Arduino IDLE and the steps below you can install the required libraries.
- Sketch --> include library --> manage libraries
- Search for dynamixel shield
- Install the latest version of DynamixelShield as well as Dynamixel2Arduino
For more information, refer to this.
Assembling the setup

- The pins on the dynamixel shield are similar to the pin on the Arduino board so dynamixel shield can be placed directly on the Arduino Uno. For communication we use TTL.
- Connect the dynamixel PSU to power port of Ardunio uno and as well as USB to connect the board to pc. (Refer to setup image)
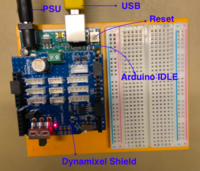 Setup.png
 - Using 3P connecter connect the dynamixel to TTL port on the Dynamixel shield (See Layout image)
- To upload the code:
- Set UART SW to upload and let the power SW be off. (See Switch layout image)
 Switch layout
 - Upload the code using Arduino idle and USB.
- Set UART SW to upload and let the power SW be off. (See Switch layout image)


You can test out or use the given examples as a starting point:
- Files --> Examples --> DynamixelShield --> basic
Note: Remember to change protocol, baudrate, id accordingly for each example.
Note:
Protocol for AX and MX series: 1.0
Protocol for X and Dynamixel Pro series: 2.0
Depending on the Arduino idle version, you might get a warning message of the following sort:
In function 'fast_parse_dxl2_0_packet':
warning: implicit declaration of function 'malloc' [-Wimplicit-function-declaration]
uint8_t* param_array = (uint8_t *)malloc(sizeof(uint8_t) * size);
warning: incompatible implicit declaration of built-in function 'malloc'
include '<stdlib.h>' or provide a declaration of 'malloc'
To remove this warning, you can add the following code line at the start of the program:
#include <stdlib.h>
- Once uploaded, toggle the UART SW to dynamixel, turn on the power. The dynamixel should operate according to the code.
- If the power SW was on, then you would need to reset the Arduino uno after toggling the UART SW to dynamixel.
For more detailed information, refer to the guide.
